Gardening is a popular hobby that many of us pursue or want to pursue. I mean who does not want to have green plants in his or her living space? Whether they are floral plants, or fruit trees and vegetables, or maybe cute cactuses, they always make your living space better whether it is your home or office.
But some of us may be worried about maintenance or may have failed to keep these green plants due to lack of maintenance. So, in this article, we are going to discuss a project which will give you relief from watering your plants daily. We will discuss how to build a low-cost DIY automated plant watering system. This system will water your plants whenever the moisture level of the soil is low. Excited? Then let’s begin.
Hardware Required:
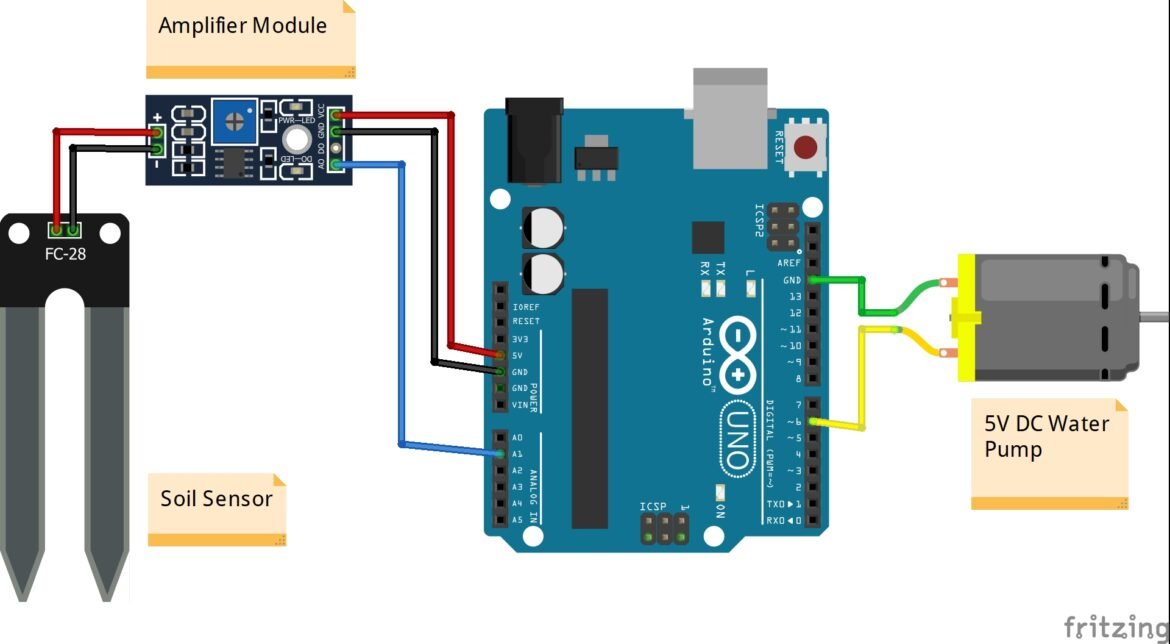
In this project, the main two things which we are going to use our soil moisture sensor and a 5V dc water pump. We can use a pump of higher power but in that case, we will need additional components like relay modules. Next, we will need a microcontroller. For that, we are going to use Arduino UNO. But again, you can use other boards of Arduino like Nano, Mini, Mega, etc. These are the main three parts of the system. Apart from all these, we will also need a USB B type cable to upload code to the Arduino UNO board, both male to female and female to female jumper wires, and a mini rubber pipe of suitable length to connect with the water pump.
Software Required:
To program the microcontroller on the Arduino board, we shall use Arduino IDE as it is the only software required.
Hardware Connections:
This is a very simple project with minimal hardware connections. Now let’s discuss the connections one by one.
- In the case of a soil moisture sensor, we get two modules – a sensor and an amplifier module. First, we need to connect the sensor with the amplifier module using two female to female jumper wire. Next, we need to connect the VCC and GND of the amplifier module to the 5V and GND of the Arduino. Then we connect the AO pin of the amplifier module to the A1 pin of Arduino. Here we have chosen the A1 pin but you can choose any analog pin. But remember, you have to change the following code accordingly.
- Now we need to connect the 5V DC water pump to the Arduino. To do that we just need to connect the +ve wire of the pump to D6 of Arduino and -ve wire of the pump to the GND of Arduino. We have chosen D6 because it is a PWM pin as well so if you want to use analog input and control the water flow then you can use the same pin. If we use a pump with a higher power, we’ll need a relay module to make the connections. To know how to use a relay module please read our tutorial on home automation
To summarize all these connections, we have provided a circuit diagram below.

Working
Now let’s discuss how the system will work. We need to implant the moisture sensor in soil nearby of the plant. Now fix one end of the rubber pipe to the output of the pump and fix the other end of the pipe near the plant so that waterfalls at the base of the plant. Though we can take analog data input for soil moisture, as our task is to turn the pump on and off only, we will take digital data input from the sensor. This means the sensor data will be HIGH or 1 when the moisture level surpasses a certain value and the data will be LOW or 0 when the moisture level falls below the value. So, when the moisture level is low, the value of input data will be 0 and using this value as a condition we will turn the pump on to water the plant.
Code
const int PUMP = 6; //pin connected to pump
const int sensor = A1; //analog pin connceted to sensor
int value;

void setup() {
  pinMode(sensor,INPUT);
  pinMode(PUMP, OUTPUT);
  Serial.begin(9600);
}

void loop() {
  value = digitalRead(sensor);
  if(value==0){
    digitalWrite(PUMP, HIGH);//Turn pump on
    delay(3000); //Water for 3 sec
    digitalWrite(PUMP,LOW);//Turn pump off
  }
  else{
    digitalWrite(PUMP,LOW);
  }
  delay(10000); //After watering plant wait for 10 sec so that the sensor reads new & correct data.
}
Conclusion
There are a few things about this project that we need to keep in mind. We have pointed them out below:
- Moisture sensor to be implanted nearby the plant so that when it is watered, the sensor can read the new moisture level quickly.
- At the end of the loop function in the code, we should give a delay of the significant amount i.e. 10 to 15 seconds. So that the sensor doesn’t take data input while water spreads around the base of the plant.
- We have taken 0 as the input for low moisture level but if, in your case, it is 1 then please change the code accordingly.
- As we are working with water, please keep the amplifier module and the Arduino at a safe distance.
Hope that you are clear with the tutorial ‘Automatic Plant Watering System’. If you have any doubts feel free to comment below. Thank You.